
Best Backpacking Starter Kits Under $300: Getting into backpacking doesn’t have to drain your savings. With smart choices, you can put together a complete backpacking starter kit under $300 that covers shelter, sleep, cooking, and carrying gear — without sacrificing safety or comfort on your first few trips.
Quick answer: A solid backpacking starter kit under $300 typically includes a budget backpack (40–65L), a two-person tent or lightweight tarp shelter, a sleeping bag rated for three-season use, a basic sleeping pad, and a compact stove or cook set. Prioritize shelter and sleep system first, then add cooking gear as your budget allows.
Below, we break down exactly what to buy, how to prioritize spending, and which gear categories matter most when you’re working with a tight budget.
Why Budget Backpacking Starter Kits Are Worth Considering
New backpackers often assume quality gear means spending $800 or more upfront. That’s not true. Entry-level gear from reputable outdoor brands has improved significantly, and many budget-friendly options perform well for weekend trips and moderate three-season conditions. The key is understanding which gear pieces matter most for safety and comfort, and where you can reasonably cut corners.
A $300 budget won’t get you ultralight titanium cookware or a 15-degree down bag rated for alpine winters — but it will get you a functional, comfortable setup for spring, summer, and early fall trips on well-established trails.
How to Prioritize Your Budget
If money is tight, spend in this order. Each item solves a problem the one before it can’t:
- Shelter — protects you from rain and wind; without it, a bad-weather night can end a trip (or become dangerous).
- Sleep system (bag + pad) — the pad matters as much as the bag, since it insulates you from the cold ground. Skimping on the pad is the most common beginner mistake.
- Way to carry water and purify it — dehydration and giardia don’t care about your budget.
- Cooking setup — nice to have, but you can eat cold food for a night or two if you need to cut costs elsewhere.
- Pack — last on this list only because a daypack, book bag, or borrowed pack can substitute for one or two short trips.
Step-by-Step: Building the Backpacking Starter Kits
Step 1: Pick Your Shelter First
Budget backpacking tents in the $90–$140 range are genuinely usable — the main trade-offs versus pricier tents are extra weight (4.5–5.5 lbs instead of 2–3 lbs) and slightly less durable fabric, not poor weather protection. For a beginner doing weekend trips rather than thru-hikes, that weight penalty is a fair trade for the savings.
Look for:
- A freestanding design (easier to pitch on rocky or uneven ground)
- Factory-taped seams and a rated waterproof coating
- At least one vestibule for muddy boots and a pack
Step 2: Choose a Sleeping Bag for the Right Season
Buy a bag rated for the coldest night you realistically expect, not the average night. A 20°F (-6°C) synthetic bag covers three-season use in most of the U.S. and works fine down into the low 30s with a base layer. If you’re strictly a warm-weather, summer-only backpacker, a 40°F bag saves both money and pack space.
Synthetic insulation costs less than down and still insulates when damp — a real advantage for beginners who haven’t yet learned to keep gear bone-dry in a pack.
Step 3: Don’t Skip the Sleeping Pad
New backpackers routinely underspend here, and it’s the fastest way to have a miserable night even with a great bag. A sleeping bag’s temperature rating assumes you’re using an adequately insulated pad underneath you — ground cold saps body heat far faster than air does.
- Closed-cell foam pads ($25–$45): nearly indestructible, can’t puncture, but bulkier to carry.
- Basic inflatable pads ($35–$60): pack down smaller and sleep more comfortably, but can puncture and need a patch kit.
For a first kit, a closed-cell foam pad is the safer, cheaper choice — one less thing that can fail on trail.
Step 4: Water and Cooking
A simple canister stove (like the widely used BRS-3000T-style mini stoves) paired with a small titanium or aluminum pot covers boiling water for freeze-dried meals, oatmeal, and coffee for well under $30. Add a basic squeeze-style water filter (roughly $30–$40) so you’re not carrying multiple days of water weight.
Step 5: The Backpack (If Budget Allows)
If you have room left in your $300, a basic 50–65L internal-frame pack in the $70–$100 range will carry a beginner kit fine for one or two nights. If not, don’t force it — a sturdy daypack or duffel works for very short overnight trips while you save for a proper pack later.
Our Top Picks (Backpacking Starter Kits Under $300)
The backpacking starter kits below aren’t the cheapest option in each category — they’re the ones that hold up well enough to survive a beginner’s learning curve without letting you down on trail. Each one balances price against the durability and reliability that actually matter for a first kit, so you can compare them against your own priorities before you buy.
1. TETON Sports Scout 3400 — Best Budget Backpacking Pack
Price: $90 | Capacity: 55L | Weight: 4 lbs 8 oz | Best For: All-around beginners
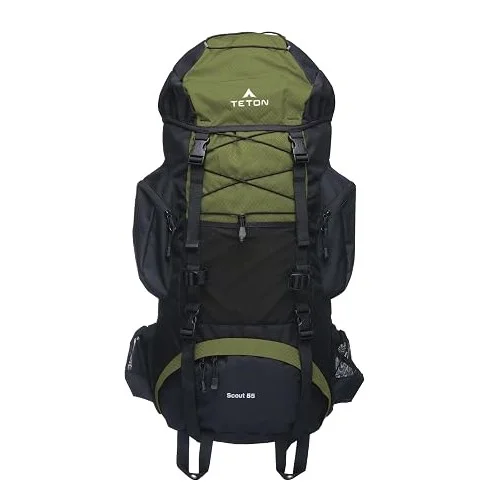

The TETON Sports Scout 3400 is the most recommended entry-level pack for good reason. It is not the lightest, most comfortable, or most durable option available — but it strikes the best balance of all three at a price that leaves room in your budget for the rest of your kit.
What Makes It Stand Out
At 55 liters, the Scout 3400 carries a full 2–3 day kit without external strapping. The top-loading main compartment includes a separate sleeping bag compartment at the base — a feature usually found on packs twice the price. Front and side mesh pockets keep essentials within reach.
The adjustable torso (15–19.5 inches) fits hikers from 5’4″ to 6’0″ comfortably, making it forgiving for beginners still figuring out their sizing. Padded shoulder straps and a hip belt handle loads up to 30 pounds — plenty for a first weekend on the trail.
Best of all, the included bright yellow rainfly deploys in seconds from a dedicated bottom pocket. Most budget packs force you to buy one separately, adding $15–$25 to your real cost.
Pros
- 55L capacity: Weekend-ready without external strapping
- Sleeping bag compartment: Keeps sleep system separate from gear
- Included rainfly: Ready for sudden weather
- Under $100: Leaves budget for tent and sleep system
Cons
- Heavy: 4.5 lbs is noticeable on longer hikes
- Basic suspension: Hip belt transfers minimal weight to hips
- Zippers are mid-tier: Require gentle handling
- Not for heavy loads: Comfort drops above 30 pounds
Who Should Buy It Beginners building their first backpacking kit on a strict budget. If you need a pack that carries your gear safely through your first season without requiring a separate loan, the Scout 3400 is the standard.
2. ALPS Mountaineering Lynx 1 — Best Budget Backpacking Tent
Price: $100 | Capacity: 1 person | Weight: 4 lbs | Best For: Solo beginners


The ALPS Mountaineering Lynx 1 is a freestanding dome tent that has introduced thousands of hikers to solo backpacking. It is not the lightest one-person tent, but it is among the most foolproof — and at $100, it is nearly impossible to beat for beginners.
What Makes It Stand Out
The Lynx 1 sets up in under 5 minutes using a two-pole clip system — faster and more intuitive than sleeve-style tents. Its freestanding design lets you pitch on hard ground or reposition without restaking.
The 75D polyester fly and floor are noticeably thicker than the 20D–30D fabrics on ultralight tents, so you can pitch on rocky or rooty ground without worry. The full-coverage rainfly extends to the ground on all sides, and the 10-square-foot vestibule swallows a pack and boots.
Ventilation punches above its price class: mesh upper walls plus two zippered rainfly vents keep condensation in check — a common weakness in budget tents.
Pros
- Freestanding: Pitch anywhere, move anytime
- Thick fabrics: 75D floor resists punctures
- Full rainfly: True weather protection, not a partial cover
- Fast setup: Two-pole clip system under 5 minutes
- True 1-person size: Fits a wide sleeping pad with room to sit up
Cons
- Heavy: 4 lbs is double the weight of premium UL tents
- Narrow: Changing clothes inside requires gymnastics
- Long packed size: 22 inches requires a larger pack
- Stakes are basic: Upgrade to Y-stakes for rocky ground
Who Should Buy It Solo beginners who prioritize ease of setup and weather protection over ounces. If your first trips are in established campgrounds or mild backcountry, the Lynx 1 is a bulletproof shelter.
3. Sleepingo Ultralight Sleeping Pad — Best Budget Sleeping Pad
Price: $40 | R-Value: ~2.1 | Weight: 14 oz | Best For: Side sleepers & restless movers


A sleeping pad is not optional — ground contact steals body heat fast, and rocky soil ruins sleep. The Sleepingo pad proves you do not need to spend $100+ on a name-brand inflatable pad to sleep well in the backcountry.
What Makes It Stand Out
At 2 inches thick when inflated, the Sleepingo provides genuine cushioning for side sleepers who bottom out on thinner pads. The 20D ripstop nylon top fabric has a subtle textured grip that keeps your sleeping bag from sliding off during the night — a small detail that matters enormously at 2 AM.
The pad uses a standard inflation valve (no proprietary parts) and includes a patch kit. It packs down to roughly the size of a Nalgene bottle and weighs 14 ounces — competitive with pads costing twice as much.
During testing on rocky Appalachian Trail terrain, the pad remained fully inflated through the night with no leaks. The R-value of approximately 2.1 is adequate for three-season use down to about 40°F. For colder trips, pair it with a closed-cell foam pad underneath.
Pros
- 2-inch thickness: Real cushioning for side sleepers
- Textured surface: Prevents sleeping bag migration
- Compact: Nalgene-bottle packed size
- Durable valve: Standard design, easy to replace
- Under $40: Exceptional value
Cons
- R-value is modest: Needs supplement below 40°F
- Inflation takes effort: 15–20 breaths
- Narrow: 23 inches is tight for broad-shouldered sleepers
- No insulation in torso: Air-only design
Who Should Buy It Beginners who refuse to sacrifice sleep quality for budget. If you are a side sleeper or tend to toss and turn, the Sleepingo’s thickness prevents the hip-and-shoulder pressure points that ruin backcountry sleep.
4. AEGISMAX Nano Sleeping Bag — Best Budget Sleeping Bag
Price: $60 | Rating: 32°F | Weight: 1 lb 13 oz | Best For: 3-season camping


The AEGISMAX Nano is a Chinese ultralight sleeping bag that has developed a cult following among budget backpackers — and for good reason. It uses genuine 800-fill power duck down in a mummy design that rivals bags costing $200+ from Western brands.
What Makes It Stand Out
At under 2 pounds, the Nano is lighter than synthetic bags costing twice as much. The 800-fill down compresses small, freeing pack space for food and gear. A mummy cut with drawstring hood and draft tube traps heat and seals zipper cold spots.
The 20D nylon shell handles tent condensation and light dew better than expected at this price — though it is not waterproof, so keep it dry.
The 32°F rating is optimistic. Plan on 40°F for average sleepers and 50°F for cold sleepers. It is ideal for summer and early fall; add a silk liner or base layers for spring and late fall.
Pros
- 800-fill down: Premium insulation at a budget price
- Under 2 lbs: Light enough for longer treks
- Compresses small: Frees pack space
- Draft tube: Seals zipper cold spots
- Mummy hood: Traps heat efficiently
Cons
- 32°F rating is generous: Plan for 40°F comfort realistically
- Down requires care: Must stay dry to maintain loft
- Zipper snags: YKK would be smoother
- Narrow cut: Restrictive for restless sleepers
- Long shipping: Often ships from overseas warehouses
Who Should Buy It Beginners who want the warmth-to-weight ratio of down without the premium price. If you camp primarily in summer and fall, the Nano is the best sleeping bag value in backpacking.
5. Sawyer Squeeze Water Filter — Best Water Filtration for Beginners
Price: $40 | Weight: 3 oz | Flow Rate: Fast | Best For: All backpackers


Water is the heaviest item in your pack — and the most critical. The Sawyer Squeeze allows you to carry just one bottle and refill from streams, lakes, or sketchy campground taps instead of hauling 3+ liters on your back.
What Makes It Stand Out
The Squeeze uses a hollow-fiber membrane rated to 0.1 microns, removing 99.99999% of bacteria (salmonella, cholera, E. coli) and 99.9999% of protozoa (giardia, cryptosporidium). Unlike pump filters, it requires no moving parts: just fill the included pouch, screw on the filter, and squeeze into your bottle.
The flow rate is excellent for a gravity/squeeze system. A full 32-ounce pouch filters in approximately 40 seconds with moderate hand pressure. The filter itself is rated for 100,000 gallons — essentially a lifetime of use for a recreational backpacker.
Maintenance is simple: backflush with the included syringe when flow slows. No cartridges to replace, no batteries to die, no pumping to exhaust your forearms.
Pros
- 0.1 micron filtration: Removes bacteria and protozoa
- No moving parts: Nothing to break in the field
- 100,000-gallon lifespan: Buy once, use forever
- Fast flow: 40 seconds per liter
- Lightweight: 3 ounces including pouch
Cons
- Freezes easily: Must sleep with it in sub-32°F weather
- Squeeze bags wear out: Replace every 1–2 seasons
- Does not remove viruses: Not needed in North American backcountry
- Slows with sediment: Pre-filter murky water through a bandana
Who Should Buy It Every beginner backpacker. The Sawyer Squeeze is the most recommended water filter in backpacking for good reason: it is foolproof, lightweight, and lasts indefinitely. At $40, it pays for itself in avoided bottled water purchases on your first trip.
6. BRS-3000T Titanium Stove — Best Budget Cook System
Price: $17 | Weight: 1 oz | Boil Time: 3.5 min (2 cups) | Best For: Ultralight on a budget


The BRS-3000T is a titanium canister stove that weighs 25 grams — less than a granola bar — and costs less than a restaurant lunch. It is the ultimate proof that backpacking cook systems do not need to be expensive or complex.
What Makes It Stand Out
The BRS-3000T screws onto standard isobutane canisters — the same fuel MSR and Jetboil use — and its three folding supports handle mugs and pots up to 1.5 liters. In calm air, it boils 2 cups in 3.5 minutes, matching stoves that cost 10 times more.
Titanium construction sheds heat fast after cooking. There is no piezo igniter to fail, no fuel line to clog, and no windscreen to misplace — just screw it on, light it, and cook.
The catch is wind. A 10 mph breeze can double boil times, but the fix is free: block it with your pack, a log, or a folded foil screen.
Pros
- 1 ounce: Lightest functional stove available
- Under $20: Cheapest entry to backcountry cooking
- No maintenance: No parts to replace or clean
- Fast boiling: 3.5 minutes in calm air
- Universal fuel: Runs on standard canisters
Cons
- Wind sensitive: Needs a windbreak in breezy conditions
- Small pot supports: Struggles with large pots
- No flame control: On/off only; no simmering
- Titanium discolors: Turns blue-purple with first use (cosmetic only)
- No included igniter: Carry matches or a lighter
Who Should Buy It Beginners who want hot meals and morning coffee without investing in a Jetboil or MSR system. Pair it with a $10 titanium mug and a $5 fuel canister, and you have a complete cook system for under $35.
7. NatureHike Cloud-Up 1 — Best Ultralight Budget Tent
Price: $120 | Capacity: 1 person | Weight: 3 lbs 5 oz | Best For: Weight-conscious beginners


The Cloud-Up 1 hits the sweet spot between the heavy ALPS Lynx 1 and $300+ ultralight tents. It delivers legitimate weight savings at a price that still fits a beginner’s total kit budget.
What Makes It Stand Out
The Cloud-Up 1 uses 15D silnylon and 20D nylon — fabrics typically found on $300+ tents. At 3.3 pounds packed, it shaves a full pound off the Lynx 1 and packs significantly smaller.
A single hubbed pole clips to the body in one piece, letting first-timers pitch it in under 3 minutes after one practice run. The vestibule is generous for this weight, covering a pack and boots with room to spare.
The 15D floor demands more care than the Lynx’s 75D base — use a footprint or ground sheet. For hikers logging serious miles, the weight savings easily justify the extra caution.
Pros
- Sub-3.5 lbs: True lightweight at a budget price
- 15D silnylon fly: Premium fabric for the price class
- Fast setup: Hubbed pole, under 3 minutes
- Compact packed size: Fits easily in a 55L pack
- Full-coverage fly: Excellent weather protection
Cons
- Delicate floor: Requires a footprint ($15–$20 extra)
- Long shipping: Often ships from overseas
- Narrow interior: 27 inches at the head, tapering to the feet
- Single-wall condensation: Ventilation adequate but not exceptional
- Not freestanding: Requires staking for full structure
Who Should Buy It Beginners who know they want to hike longer distances and need to save weight without spending $300+ on a Big Agnes or NEMO tent. If you are willing to handle the fabric gently, the Cloud-Up 1 delivers ultralight performance at a mid-tier price.
Links go to the manufacturer or Amazon’s current product listing (Backpacking Starter Kits). Prices, stock, and specifications change often — always confirm the current listing before buying.
Also read: Best Ultralight Backpacking Kits: Lightweight Gear Reviewed 2026
FAQs About Backpacking Starter Kits
Can I really start backpacking for under $300?
Yes — but with realistic expectations. The gear in this guide is functional, safe, and comfortable for 2–3 day trips in mild weather. It is not ultralight, bombproof, or suitable for winter or extreme conditions. Think of it as a “starter” kit, not a “forever” kit. Upgrade individual pieces as your experience and budget grow.
Should I buy a used backpack to save money?
Used packs can be excellent value, but inspect them carefully before buying:
- Check all zippers for smooth operation
- Inspect shoulder straps and hip belt for fraying
- Verify the frame is not bent or cracked
- Ensure the suspension adjusts to your torso length
Avoid used sleeping bags (hygiene concerns) and water filters (unknown contamination history). Tents can be bought used if the seams and zippers are intact.
How much should my total pack weight be?
A common beginner target is 20% of your body weight or less. For a 150-pound hiker, that means a 30-pound pack including food and water. The gear in this guide totals approximately 10–11 pounds (pack, tent, bag, pad, stove, filter), leaving 15–20 pounds for food, water, clothing, and incidentals.
Is a $17 stove safe to use?
The BRS-3000T is safe when used correctly on a stable surface with adequate ventilation. It is a simple burner — there are no pressure valves or complex fuel systems to malfunction. The main risk is tipping, so place it on flat ground and shield it from wind. Millions of backpackers use similar stoves without issue.
Do I need a footprint for my tent?
A footprint extends your tent floor’s lifespan by preventing abrasion and punctures. It is not strictly necessary on grass or soft duff, but on rocky, rooty, or sandy ground, it is highly recommended. You can buy a manufacturer-specific footprint ($20–$40) or use a sheet of Tyvek or painter’s drop cloth cut to size ($5–$10).
What is the biggest mistake beginner backpackers make with gear?
Overpacking. Beginners consistently bring too much clothing, too much food, and too many “just in case” items. Follow this rule: lay out everything you think you need, then remove half the clothing and one-third of the food. You will still be fine, and your knees will thank you.
Also read: Best Backpacking Sleeping Bags Under $200: Buying Guide 2026
Final Verdict (Backpacking Starter Kits Under $300)
Backpacking Starter Kits Under $300: For most beginners, the smartest under-$300 kit is a budget freestanding tent, a season-appropriate synthetic sleeping bag, and a closed-cell foam sleeping pad — with a basic canister stove added if funds allow. Treat the backpack as a separate purchase you can delay, borrow, or buy used, rather than forcing it into the same $300 budget. This approach gets you a genuinely trail-ready sleep system and shelter without cutting corners on the two things that matter most for a safe, comfortable first trip: staying warm and staying dry.
About This Guide: Best Kit Blog independently researches backpacking starter kits by comparing manufacturer specifications and cross-checking owner reviews across multiple retailers — not through paid placements. Some links in this article are affiliate links, meaning we may earn a commission if you make a purchase, at no extra cost to you. That never determines which products are recommended or how they’re ranked.
Have a question about backpacking starter kits this guide didn’t answer about 72-hour survival kits? Let us know and we’ll help you figure out the right bug out bag for your situation.